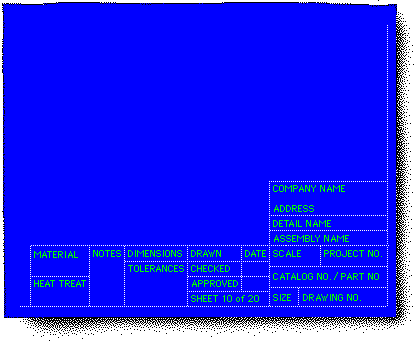
Parts of the Title Block:
- MATERIALS: Can designate material of piece part or material to be used for actual tool or mold.
- HEAT TREAT: Usually designated on a Rockwell C scale, refers to hardness of material.
- NOTES: General information needed to complete tool (all sheets).
- DIMENSIONS: States whether dimensions are metric or English.
- TOLERANCES: Print dimensioning tolerances. This will be reviewed in a subsequent learning topic.
- DRAWN: Draftsmen or person responsible for drawing the print.
- CHECKED: Name of person who checked the print, such as a drafting supervisor.
- APPROVED: Person responsible for final approval, such as a chief engineer.
- DRAWN DATE: Date the print was drawn.
- SHEET NUMBER: Designates sheet number and the number of prints to a set.
- COMPANY NAME & ADDRESS: Name and address of company that owns the part.
- DETAIL NAME: Name of part or detail of a whole tool or mold. May be an exploded view or a section of a total mold assembly.
- ASSEMBLY NAME: Name of total mold assembly the illustrated part belongs to.
- SCALE: Scale of drawing. May be specified as “Full” meaning actual size. The draftsman may choose to explode to 2X, 3X, etc. for clarity.
- PROJECT NO.: Project number is the accounting number to be charged with any associated labor or materials.
- CATALOG NO./PART NO.: Catalog number or part number of illustrated tool or mold.
- SIZE: Size of drawing. Options are A, B, C, D, or E.
- DRAWING NO.: Company specific numbering system to be used for filing purposes of master drawings.
Page 5 of 21

